
If you are looking for manual tips and tricks to make your computer 10 times faster, then you have landed at the right page. In this blog post, we are going to describe free as well as the professional technique for increasing computer speed (Laptop & Desktop). After reading this complete write-up anyone can easily boost computer speed Windows 10. For completing the task, you will need to remove temporary files in Windows 10 files, cleanmgr system files, delete system prefetch files, etc. from your machine. A lot of users are searching these types of queries in the search engines for increasing laptop speed or desktop speed.
Heading Contents:
- Before Moving Further let’s know this first.
- 6 Things You Must Delete to Boost Up Windows PC (Manually).
- What more you can delete to Boost Up your PC?
- Auto delete Temporary, %Temp%, Recent and prefetch folder each time your computer starts.
- How can I enable or disable indexing on Windows?
- Fix Disk 100% Slower, Update 2020. No SSD
- Download 3 Applications All in one
- Video - Part1
- Video - Part2
- Video - Part3
1. Run utility – In windows when you click WIN+R button then Run utility will be opened for you. Here you can enter commands, to directly open a file in Windows. Like Cmd for Command prompt. You can find the list of Run Utility Commands below.

2. To delete a file in windows. you just need to select the file and you have to press the delete button. Now, In Windows Selection and deletion can be done in different ways by using some keys, commands and by using a mouse.
3. Sometimes special permissions are required to delete a file. A pop-up window will open and you have to allow it.and sometimes a file will not be deleted because it’s open or currently running.

6 Things You Must Delete to Boost Up Windows PC (Manually).
#1. Recent files
In windows, recent files are just a 1-2Kb shortcut files which indicate what programs, Files, Folders you have recently opened. You have to delete recent files time to time to free up some disk space.
Deleting a Recent File
To delete a recent file, You Just need to open run utility (WIN+R) and then type recent and press Enter Key. Now recent files will be opened for you. So just Select all and click on delete button.
#2. Temporary files
Temporary files are a type of log file which an operating system creates for the smooth functioning. These file helps in faster execution and giving some quick information to the processor. But Operating system only creates it not delete it. So, you have to delete it manually.
in %temp% the percent signs indicate that this is an “environment variable” the usual value of which is C:\Documents and Settings\,yourusername\Local Settings\Temp
The directory specified by %temp% is, in fact, the directory cleaned by Disk Cleanup under the name “Temporary Files.” Why do you think Disk Cleanup isn’t removing the files? Note that Disk Cleanup does not delete files from this directory that have been accessed in the last 7 days (this time period can be changed by modifying a registry value).
Deleting temporary files
There are two folders which contain temporary files one is “Temp” and the Other one is “%temp”. you have to delete both of them. the deletion is very simple just type “temp and %temp%” one by one in run utility and recycle the files inside the folder completely.
- Types “temp and %temp%” in Run, after that click on Ok.
- Select all files and folders from “Temp” folder by pressing Ctrl + A button.


#3. Prefetch
Prefetch as the name suggests the files in this folder are prefetched, yes you are right. Prefetch is a folder which contains some files which are very necessary during the boot-up process. When a windows operating system boots up it will search for prefetch folder if it is not found it creates and keeps some important files in it which are needed for fast booting. So when you boot up the second time or restart the system. the os will use prefetch files to boot up faster.
So I can say –
Each time when you boot up your PC, Windows keeps track of the way your computer starts and which programs you commonly open. Windows saves this information as a number of small files in the prefetch folder. The next time you turn on your computer, Windows refers to these files to help speed the start process.
The prefetch folder is a subfolder of the Windows system folder. The prefetch folder is self-maintaining, and there’s no need to delete it or empty its contents. If you empty the folder, Windows and your programs will take longer to open the next time you turn on your computer
But You can delete it once in a month to delete some unnecessary files in Prefetch Folder. The deletion is same as above only the run utility command will be “prefetch” here.
- Type “prefetch” in Run and press Ok.
- A pop up is showing a warning message “You don’t currently have permission to access this folder. Click Continue to permanently get access to this folder” click on Continue.
- Select all files as well as folders from the “Prefetch” folder by pressing Ctrl + A.
- Now choose the “Delete” option by right-clicking, users can also press Shift + Delete for permanently removing the files/folders.
- Cleaning up files and folders from Prefetch with the live progressive report.


Prefetch is a component of Microsoft Windows which was introduced in Windows XP and this feature is still available in Windows 10. Prefetch is the most valuable part of Memory Manager which is helpful to increase the Windows boot process so that users can easily get the fastest speed during opening the programs.
VirtualStore
VirtualStore is a folder in AppData. AppData is a hidden folder in Windows 10/8/7 where most of the application data are kept. Judging by Microsoft’s knowledge-base articles about them, your situation (files remaining in the virtual store after uninstall) evidently is not uncommon. The answer they provide is just what you did–delete the areas manually. Specifically, you’ll open the folder C: \Users\username\AppData\Local\VirtualStore, locate the folder that contains files for your now-uninstalled program and delete the complete folder.
VirtualStore also contains downloading data which are not purely downloaded.So, Completely recycle the VirtualStore folder time to time. This will provide you some more free soace in your memory.
CrashDump Folder
Whenever an Application Software like Browser crashes, it creates a CrashDumps file. CrashDumps files are itself a big subject. The Crashdump file I am taking here is at location – C:\Users\Username\AppData\Local\CrashDumps. So don’t confuse with others. So just delete the file inside this folder time to time.
Usetreecommand in Windows 10
Type “tree” in Run shortcut and click on the Ok button

It is fixing the directory, files, folders structure, it will take a few seconds for completion.

Delete cleanmgr files and folders
- Search “Run” in Windows 10 Cortana and choose “Run” desktop app.
-

source: bitrecover - In “Run” shortcut, type “cleanmgr” and press Ok button to continue.
-

source: bitrecover - Choose “Windows (C)” from drives and press Ok button as shown in the screenshot.
-

source: bitrecover - Now select unnecessary files and folders and click on the Ok button.
-

source: bitrecover - A Windows pop up is asking “Are you sure you want to permanently delete these files?” from here hit on Delete Files option.
-

source: bitrecover - Cleaning up drive Windows (C:) with live progress, please wait.
-

source: bitrecover
What more you can delete to Boost Up your PC?
Along with the above all you can uninstall and delete all other Application which is not necessary. Try to clean up you Disk regularly. for this, you can do these two things –
- You can use software like CCleaner and
- You can use Disk CleanUp utility of your Computer
If You have any Problem in Understand anything then This video will help you to get out of it. Watch it Carefully and understand everything completely.
Auto delete Temporary, %Temp%, Recent and prefetch folder each time your computer starts/
Today in this blog I am sharing an exciting script to delete Temporary,%Temp%, Recent and prefetch folder each time your windows starts. Please go to the path C:\Users\user name\AppData\Roaming\Microsoft\Windows\Start Menu\Programs\Startup. Then write click and create a notepad file, name it as Clean.bat. Now paste the following DOS script and save clean.bat file and see the magic.
@echo off
del /s /f /q c:\windows\temp\*.*
rd /s /q c:\windows\temp
md c:\windows\temp
del /s /f /q C:\WINDOWS\Prefetch
del /s /f /q%temp%\*.*
rd /s /q%temp%
md%temp%
deltree /y c:\windows\tempor~1
deltree /y c:\windows\temp
deltree /y c:\windows\tmp
deltree /y c:\windows\ff*.tmp
deltree /y c:\windows\history
deltree /y c:\windows\cookies
deltree /y c:\windows\recent
deltree /y c:\windows\spool\printers
del c:\WIN386.SWP
cls Now everytime you restart your windows computer all the unwanted junk files in temp,%temp%, prefetch and recent folder will be deleted. This is very useful to keep your PC running smooth and fast.
How can I enable or disable indexing on Windows?
Indexing files are rather important, and in this article, we’re going to cover the following topics:
- What is file indexing – Indexing is a built-in feature of Windows that allows you to quickly and easily find certain files or applications.
- Indexing options Windows 10 – Indexing is a customizable feature, and in this article, we’re going to show you how to change basic indexing options.
- Indexing windows 10 SSD – File Indexing fully supports SSDs, and in this article, we’re going to show you how to index your entire drive.
- Windows indexing external hard drive, removable drives – Indexing fully supports external hard drives and removable drives so you can easily index files on any removable storage device.
- Windows indexing exclude – As we mentioned, Windows Indexing supports customization, and you can easily exclude any directory from being indexed. This is rather useful if you have a directory or a drive that you rarely access.
- Windows indexing rebuild, repair, reset – Sometimes your index can get corrupted and that can negatively impact your performance. However, you can easily repair your index with just a few clicks.
- Windows indexing turns off, on – Some users want to completely disable Windows Indexing. There are few ways to do that, and we’re going to cover them all in this article.
- Windows indexing file contents – Indexing also allows you to index file contents. This is rather useful if you’re working with text files and you need to find a file that has a specific word in it.
Solution 1 – Disable Windows Search service
In most cases, this service is turned on automatically, but if you want to make sure that everything is in perfect order, here’s what you need to do to enable the indexing service in Windows 10:
- Open the Run window – press Windows key + R or just type Run in the Search bar.
- Type services.msc and press Enter or click OK.

- Find the Windows Search service and double-click on it. It looks like in the right screenshot.
- Find Startup type: and select Disable from the pull-down menu. Now click the Stop button to stop the service. Click Apply and OK buttons to save changes.
- Open Win + X menu by pressing the Windows Key + X shortcut. Alternatively, you can open this menu by right-clicking the Start button. Select Command Prompt (Admin) or PowerShell (Admin) from the menu.
- When Command Prompt opens, you need to enter sc stop “wsearch” && sc config “wsearch” start=disabled and press Enter to run it.
- Press Windows Key + S and enter indexing. Select Indexing Options from the menu. If this option isn’t available from the Search bar, you’ll need to access it from Control Panel.
- Now you’ll see the list of indexed locations. Click on Modify button.
- Uncheck the locations that you don’t want to index and click on OK to save changes. If needed, you can also check a new location from the file tree to add it to your index.
- Open This PC and locate your hard drive. Right-click the desired drive and choose Properties from the menu.
- When the Properties window opens, navigate to General tab. Now uncheck Allow files on this drive to have context indexed. Click on Apply and OK.
- After doing that, you’ll get a confirmation dialog asking you to change these settings only for the root directory or for all subdirectories on the drive. Choose the desired option and click on OK.
- Open Indexing Options. You can do that quickly by typing indexing options in the Search bar and choosing Indexing Options from the list of results.
- When Indexing Options window opens, click on Advanced.
- Now click on the Rebuild button.
- 1. Press windows + R to open the Run program, type services.msc, and then press OK.
- Turn off unwanted services as follows:
- Background Intelligent Transfer Service
- Superfetch
- Windows Search
- Windows Update
- 1. Right-click the C > Disk Cleanup and wait for a while until the new page is completed.
- 2. Then press Clean up system files >, tick in front of all names (it can be seen as as large as 4.02 GB) > Press OK > Delete Files and wait a few minutes for the machine to handle (it may take quite a lot of time.) If it's too long, you can press Cancel and do it again later.)
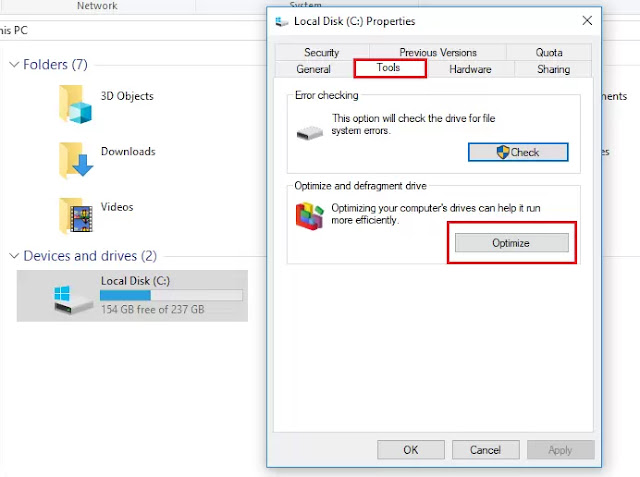
- 1. Go to our Drive C and then right-click, select Properties >, select the Tools > Optimize.
- 2. Next, select Drive C >, click Change Settings >, tick the check mark off Run on a schedule, > press OK.


Now restart your PC.
After your PC restarts, Windows Indexing feature should be completely disabled on your PC. To turn it back on, simply undo the changes you made in this solution.
As you can see, ‘Windows Search’ is responsible for content indexing, property caching, search results for files, emails, and other content.
So, by enabling or disabling it, you will consequently turn on or turn off the above-mentioned features. You can easily choose to stop or restart the service, in case you have problems with it.
Turn off Indexing using Command Prompt
Disabling Indexing is rather simple from the Services window, but if you’re an advanced user, you can disable it from Command Prompt. To do that, just follow these steps:


After doing that, you’ll stop Windows Search service instantly and the Indexing feature should be disabled. As you can see, this is a fast and simple way to disable Indexing, so if you’re an advanced user and you want to disable this feature quickly, be sure to try this method.
To enable Indexing, you just have to use sc config “wsearch” start=delayed-auto && sc start “wsearch” command.

Change Indexing options
If you want to change your indexing options, you can choose which locations you want to index. By disabling certain locations from indexing, you might improve your performance. To change this setting, do the following:


By doing this you can optimize your PC and improve your performance by disabling indexing for the directories that you rarely use.
Turn off Indexing for a specific partition
If you want to improve your performance, you can disable indexing for an entire partition or hard drive. To disable indexing for a partition, you need to do the following:


After doing that, your partition and files on it will be indexed and you’ll be able to search through them.
Rebuild Search Index
Sometimes issues with indexing can occur, and your search might become slow or unable to find the desired files. If this happens, your Search Index is most likely corrupted, but you can easily fix that.
If your Search Index isn’t working properly, you can fix it by following these steps:


After doing that, you just need to wait for a couple of moments while Windows rebuilds your Search Index.
Most users don’t know what to do when the Windows search box goes missing. Read this article to learn how you can get it back in just a couple of steps.
Windows Indexing is a useful feature, and we hope that this article helped you understand how to configure or disable Indexing on Windows 10.
If you have any other questions, feel free to leave them in the comments section below.
l
Fix Disk 100% Slower, Update 2020. No SSD
Disk 100% is a classic problem that has been around for a long time until Windows 10. So, if any machines that don't have an SSD or ssd m.2 originally have a 100% disk problem, in this article, the NBS team will teach you how to relieve 100% of disk symptoms.

Disable unnecessary services to resolve disk 100.
Explain first that these services, if we close them, will have some functionality that does not work, but it does not affect the general use.


To do this, right-click > properties >, press Stop >, startup type channel, change to Disabled > press OK.
**To resume updating Windows, you must reset Windows Update to its original value.**
Remove non-Windows virus scans
Why delete a virus scanner? Buy new computers, need more virus scans. Nowadays, virus scanning is almost no need. It scans the viruses of machines like Windows Defender, which includes all Windows devices from Windows 7, 8, 8.1, and 10.

To remove the virus scan, go to Control Panel > Programs and Features >, select the virus scanner name, >, right-click Uninstall, and then restart your computer once.
or
To remove the virus scan, use Revo Uninstaller application, please watch in YouTube and can download it in the below.
Clear some disk cleanup junk files.
Since buying a computer, check out your computer if you've ever disk cleanup or delete a junk file clash. Where to call files from web playback? The clash from Windows says that many GB of junk files are definitely It's easy to delete these files. Here's how:


Turn off the defragment of the machine

Hopefully this article will be useful to NBS friends, all of which may be a relief, not a real solution, so if any of your friends want to fix it, it is recommended that you buy an SSD or SSD m.2 to use in Windows. I assure you, life will be much better.
Download 3 Applications - All in one

Part1
Part2
Part3
Read more on Cleaning and speed up windows
This artical was last updated on Sept 26 2021


0 Comments